Introduction to Japanese Milk Bread by Hand
Why Japanese Milk Bread is a Game-Changer for Homemade Food Lovers
If you haven’t tried making Japanese milk bread by hand, you’re in for a delightful surprise. This pillowy, soft bread has risen to fame in bakeries around the world, and for good reason. Its unique texture combines a perfect chewiness with a cloud-like softness that elevates everything from sandwiches to toast. The best part? You can easily whip up this amazing bread right in your kitchen without any fancy gadgets or additives like milk powder.
One of the standout qualities of Japanese milk bread is its yudane method, which is a simple technique involving a mixture of flour and hot water. This creates a gelatinization of starch that retains moisture and enhances the bread’s texture. When you slice into a loaf of freshly baked milk bread, you’ll instantly appreciate its delectable softness and intriguing sweetness.
Why Try Making Your Own?
You might be wondering, why should you make Japanese milk bread yourself instead of just picking up a loaf from the store? Here are a few compelling reasons:
- Quality Control: You get to choose your ingredients. This means no preservatives or unwanted additives. It’s pure, wholesome goodness in every bite.
- Customization: Want to add a hint of matcha or a swirl of red bean paste? The sky’s the limit with homemade bread.
- Cost-Effective: Making several loaves at home can often be more economical than purchasing artisanal bread at a bakery.
Imagine starting your morning with slices of warm, homemade milk bread topped with avocado smash or Turkey Bacon. Sounds enticing, right?
A Note on the Process
Embarking on the journey of crafting Japanese milk bread by hand may seem daunting at first, but with practice, it becomes second nature. The act of kneading dough can be a therapeutic experience, and soon you’ll find yourself mastering the perfect rise and texture.
To enrich your baking journey, consider checking out resources like The Perfect Loaf or Breadtopia, which provide invaluable tips and techniques for home bakers.
So, are you ready to transform your baking game? Let’s dive into the recipe and awaken your inner baker. The world of Japanese milk bread awaits you!
Ingredients for Japanese Milk Bread by Hand
Essential ingredients for a soft texture
Making Japanese milk bread by hand is all about achieving that coveted pillowy softness. Here are the key ingredients you’ll need:
- All-purpose flour: This will be the foundation of your bread. It provides the right balance of structure and tenderness.
- Water: Use lukewarm water to activate the yeast and help create a fluffy crumb.
- Yeast: Instant or active dry yeast will work well. Just ensure it’s fresh for optimal leavening.
- Sugar: A bit of sugar not only sweetens the dough but also helps with browning and moisture retention.
- Butter: Using unsalted butter enriches the dough and gives it that luxurious, smooth texture.
- Salt: Essential for flavor and dough strength, a little goes a long way.
Additional options for flavor enhancements
Once you’ve got the basics down, you can experiment with some fun additions to take your Japanese milk bread by hand to the next level:
- Honey or Maple Syrup: Substitute part of the sugar with either for a unique sweetness.
- Milk or Cream: If you’re aiming for an even creamier texture (without milk powder), consider adding a splash of milk or cream.
- Zest or Spices: A touch of orange zest or a hint of cinnamon can add a delightful twist.
By focusing on these quality ingredients, you’re well on your way to baking irresistible Japanese milk bread that will impress friends and family. For more insights on baking with yeast, check out this expert guide from King Arthur Baking Company. Happy baking!
Step-by-Step Preparation of Japanese Milk Bread by Hand
When it comes to making Japanese milk bread by hand, the process is as delightful as the end product. This soft, fluffy bread is a pleasure to bake and even more enjoyable to eat. Ready to get your hands floury? Let’s dive in!
Gather Your Ingredients
First things first, let’s gather everything you need. Here’s a simple list to ensure you have all the ingredients at the ready:
- 3 cups all-purpose flour
- 1/4 cup granulated sugar
- 1 teaspoon salt
- 2 tablespoons unsalted butter, softened
- 1 tablespoon active dry yeast
- 1 cup water (approximately 110°F, warm but not hot)
- 1 egg (for egg wash, optional)
Make sure you have a clean workspace and all your tools handy — a mixing bowl, a whisk, a spatula, and a clean surface for kneading.
Make the Tangzhong (Starter)
The secret to that incredible Japanese milk bread by hand texture lies in the tangzhong. This simple starter adds moisture and helps create that pillowy softness. Here’s how to make it:
- In a small saucepan, mix together 1/4 cup of flour and 3/4 cup of water.
- Heat the mixture over medium heat while constantly stirring. You’ll want to cook it until it thickens and starts to bubble, about 3-5 minutes.
- Once thickened, remove from heat and let it cool to room temperature.
This tangzhong can also be prepared ahead of time, which is a great trick for those of us who are busy.
Mix the Dough Components
In a large mixing bowl, combine the flour, sugar, and salt. Make a well in the center and add the yeast mixture, followed by the cooled tangzhong and the warm water.
Using a spatula, mix everything together until a shaggy dough forms. You might wonder, “Is it sticky enough?” Yes, don’t worry; that texture is just what we want here!
Knead the Dough to Perfection
Now we’re going to get hands-on! Turn the dough out onto a lightly floured surface. Knead the dough for about 10-15 minutes. Here’s a good technique:
- Press down and forward with the palms of your hands.
- Fold it over, give it a quarter turn, and repeat.
The goal is to develop the gluten to give the bread that delightful chewiness. If it gets too sticky, feel free to add a dusting of flour, but go easy on it!
Let the Dough Rise and Shape It
Once your dough feels smooth and elastic, place it in a lightly oiled bowl and cover it with a damp cloth or plastic wrap. Let it rise in a warm spot until it doubles in size, usually about 1-2 hours.
When it has risen, gently punch it down (what a satisfying feeling!) and turn it out onto a floured surface. Shape it into a rectangle and then roll it up tightly. Place your shaped dough into a greased loaf pan.
Final Proofing Before Baking
Cover the loaf with the damp cloth again and let it rise for another 30-60 minutes, or until it puffs up nicely. Preheat your oven to 350°F during this time to ensure it’s nice and hot when the bread is ready.
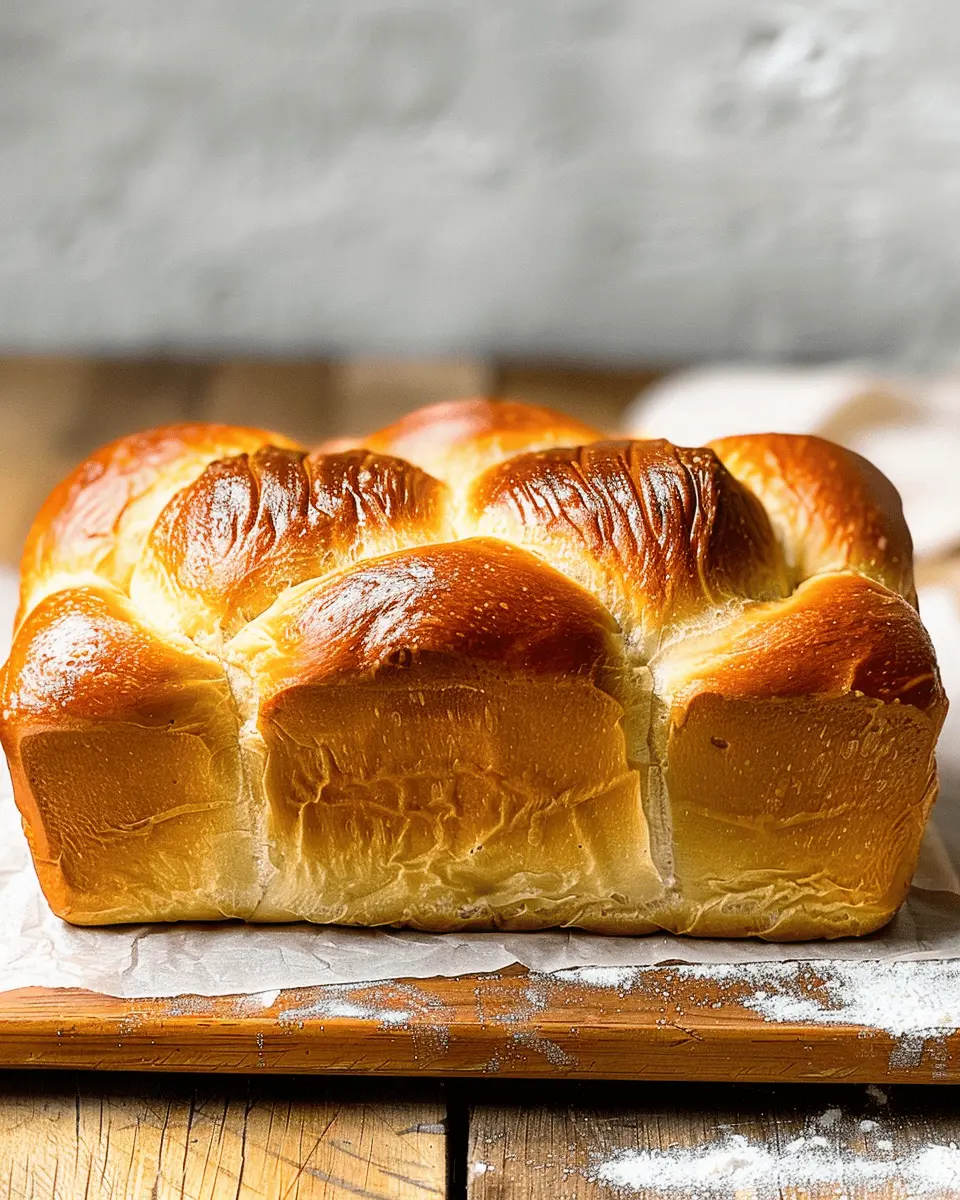
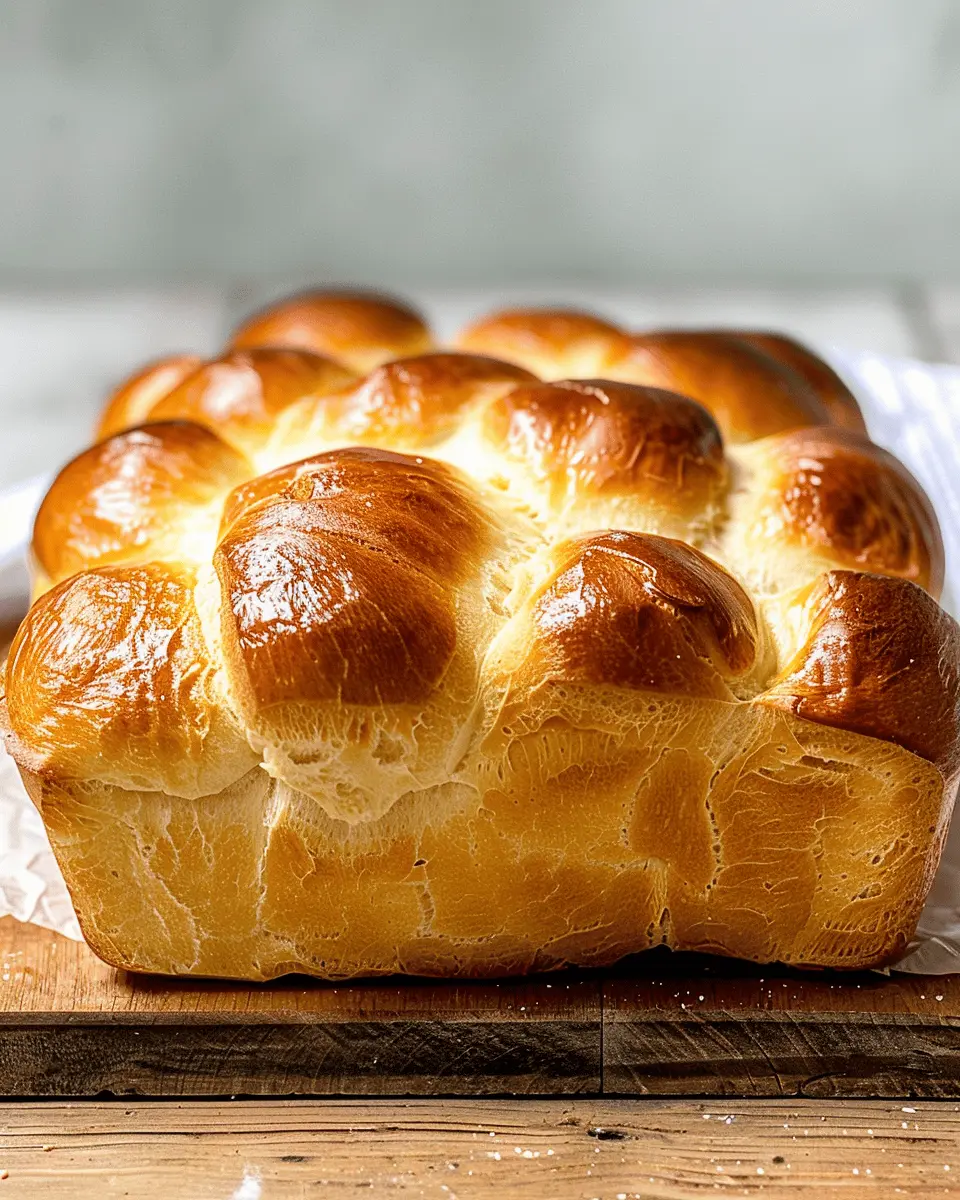
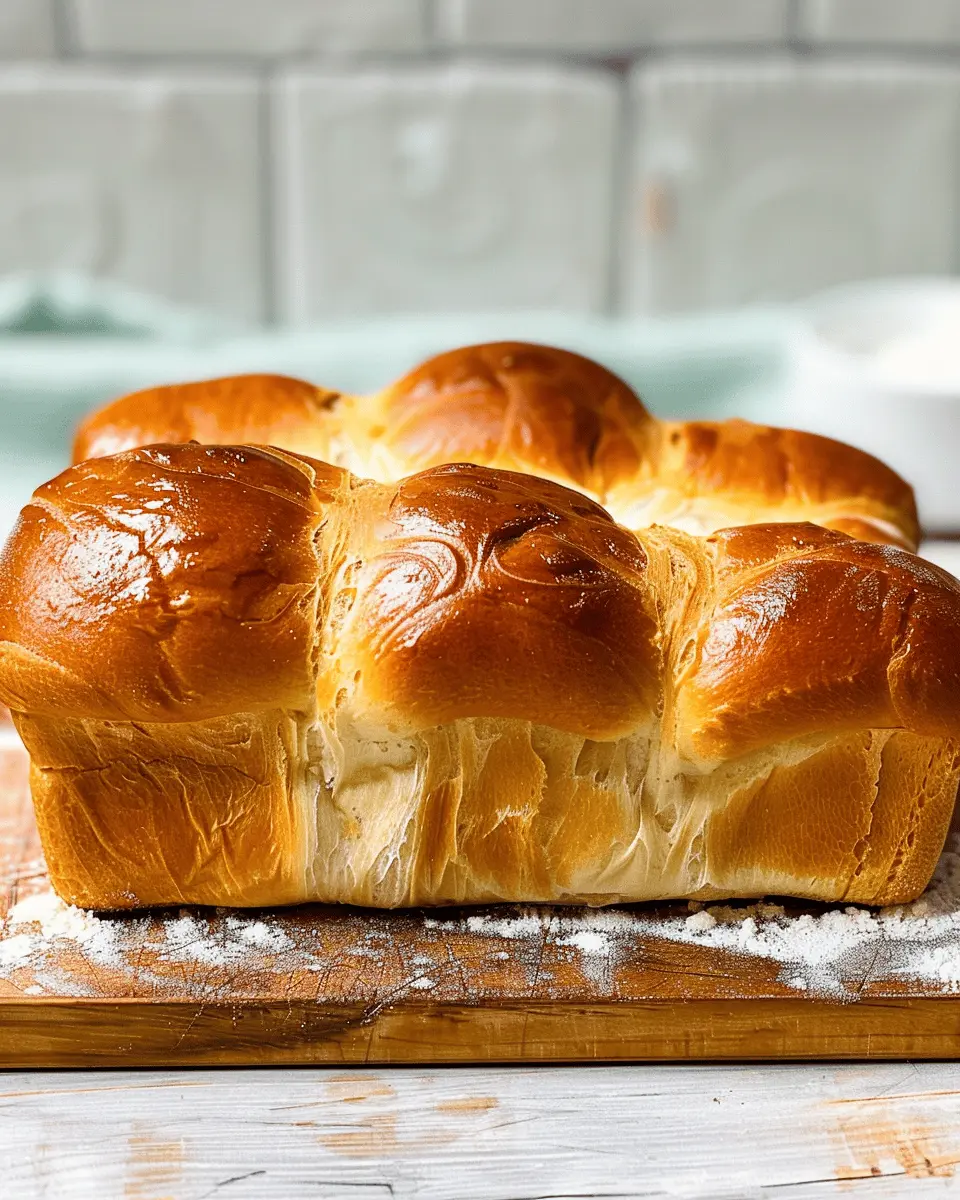
Bake the Bread to Golden Perfection
Just before you pop the bread into the oven, brush the top with an egg wash for that beautiful golden crust. Bake for 30-35 minutes, until deep golden brown and the bread sounds hollow when tapped on the bottom.
Let it cool in the pan for a few minutes before transferring it to a wire rack. Resist the urge to slice right away; this will help retain more moisture!
And there you have it! Your homemade Japanese milk bread by hand is ready to slice, toast, or enjoy straight out of the oven with some delicious spreads.
For more in-depth tips on bread-making, consider checking resources like King Arthur Baking and Just One Cookbook, which are treasure troves of great baking advice. Happy baking!

Variations on Japanese Milk Bread by Hand
Japanese milk bread by hand is a versatile dough that lends itself wonderfully to various flavors and textures. Whether you’re in the mood for something sweet or savory, there’s a delightful option waiting for you.
Sweet Variations: Adding Chocolate or Fruit
Who doesn’t love a slice of fluffy bread that feels like a treat? To make your Japanese milk bread by hand a bit sweeter, consider folding in chocolate chips or chunks of your favorite fruits. Here are some ideas:
-
Chocolate Swirl: Incorporate cocoa powder into half of the dough and create a marble effect by twisting the two together. This not only looks stunning but also adds a deliciously rich flavor.
-
Berry Delight: Add fresh or dried berries like raspberries or blueberries. Toss them with a bit of flour first to prevent them from sinking and make sure every bite is bursting with flavor.
This way, you’ll have breakfast or dessert sorted! For more flavor inspiration, check out this comprehensive guide.
Savory Options: Infusing Herbs or Spices
If sweet isn’t your style, why not go savory? Infusing your Japanese milk bread by hand with herbs or spices can elevate your loaf to a whole new level:
-
Herbed Bread: Mix in dried herbs like rosemary, thyme, or oregano directly into the dough for an aromatic finish that pairs magnificently with soups or salads.
-
Spicy Kick: For those who enjoy a little heat, try adding crushed red pepper flakes or a sprinkle of garlic powder. The result? A flavorful accompaniment to sandwiches, especially if you’re using fillings like turkey bacon or chicken ham.
Each of these variations can be tailored to your taste preferences, making meal prep even more exciting. Happy baking!
Cooking Tips and Notes for Japanese Milk Bread by Hand
When making Japanese milk bread by hand, there are a few common pitfalls to watch out for:
Common pitfalls and how to avoid them
- Under-kneading: Ensure your dough is smooth and elastic. Knead for at least 10-15 minutes until it passes the windowpane test. This helps develop gluten, resulting in a fluffy texture.
- Over-proofing: Keep an eye on your dough during the second rise. If it doubles in size too much, it could deflate during baking, leading to a dense loaf.
- Inaccurate measurements: Baking is a science. Use a kitchen scale for precise measurements, especially when it comes to flour and water.
Tools that can make your baking easier
- Dough scraper: This handy tool helps manage sticky dough and makes transferring it to the bread pan a breeze.
- Kitchen scale: For accurate measurements, a scale is a game changer. It’s also great for portioning dough.
- Stand mixer with a dough hook: If you’re willing to invest, this can save you time and effort, making the kneading process easier.
With these tips and tools for baking Japanese milk bread by hand, you’ll be well on your way to achieving that perfect, fluffy loaf! For more insights on cooking techniques, check out this practical guide.
Serving Suggestions for Japanese Milk Bread by Hand
Creative ways to enjoy your milk bread
Once your Japanese milk bread by hand is ready, the possibilities are endless! Enjoy it fresh and warm, simply spread with a bit of butter for that heavenly melt-in-the-mouth experience. For a sweeter option, try slicing it to make delightful French toast, topped with fresh fruits and a drizzle of maple syrup. Feeling adventurous? Make a classic Shokupan sandwich, layering it with avocado and Turkey Bacon for a satisfying brunch.
Pairing suggestions for a complete meal
To elevate your meal, consider pairing your milk bread with a hearty soup. A warm bowl of miso soup or a rich clam chowder complements its fluffy texture beautifully. For a light yet fulfilling dish, create a salad featuring mixed greens, cherry tomatoes, and grilled Chicken Ham, served alongside your bread.
Looking for sides? Try offering pickled vegetables or a refreshing cucumber salad to round out your meal’s flavor profile. If you’re in the mood for something sweet, a fruit compote or light whipped cream can make for a delightful dessert.
With these options in mind, you’ll surely impress your dinner guests and satisfy your taste buds. Enjoy experimenting!
Time Breakdown for Making Japanese Milk Bread by Hand
When you’re embarking on the delightful journey of making Japanese milk bread by hand, understanding the time commitments can enhance your baking experience. Here’s a simple breakdown:
Preparation Time
In total, expect about 20-30 minutes to gather ingredients and mix the dough. This is your moment to connect with the ingredients, maybe even put on some music!
Rising Time
The dough needs time to work its magic. Allow for about 1.5 to 2 hours for the first rise. After shaping, give it another 30-60 minutes to puff up. Patience is key.
Baking Time
Baking that gorgeous loaf takes around 25-30 minutes. This is when your kitchen transforms into a bakery with that irresistible aroma.
Total Time
In total, you’re looking at 3 to 4 hours, most of which is hands-off rising time. It’s worth every minute for that fluffy, cloud-like texture. For more tips on baking, visit King Arthur Flour for expert advice!
Nutritional Facts for Japanese Milk Bread by Hand
Calories per slice
When you whip up a delightful loaf of Japanese milk bread by hand, you’re creating a soft and airy treat that’s not only delicious but surprisingly nutritious. Each slice contains approximately 150 calories. This makes it a great option for breakfast or as a snack when paired with your favorite toppings!
Macronutrient breakdown
Understanding the macronutrient profile of this soft bread can help you incorporate it into a balanced diet:
- Protein: About 4 grams per slice, perfect for muscle repair and overall health.
- Fats: Generally low at about 1.5 grams, mainly from butter, which adds flavor without overwhelming calories.
- Carbohydrates: A hearty 28 grams, largely from the flour, providing the energy boost you need throughout your busy day.
With its wholesome ingredients and minimal processing, this Japanese milk bread by hand can be a delightful addition to your meals. For more detailed nutritional insights, check out resources like USDA FoodData Central or NutritionData.
Frequently Asked Questions about Japanese Milk Bread by Hand
Can I make this bread without dairy?
Absolutely! If you’re looking to make Japanese milk bread by hand without dairy, you can easily substitute the milk with a plant-based alternative. Unsweetened almond milk, soy milk, or oat milk work wonderfully. Just ensure your substitute isn’t sweetened to keep the bread’s flavor profile intact. This adjustment allows those with dietary restrictions to enjoy this soft and fluffy delight without compromise.
What if I can’t find bread flour?
No bread flour? No problem! If you can’t find it, you can use all-purpose flour instead. While bread flour contains more protein, which contributes to that delightful chewiness, you may still achieve a fantastic texture using all-purpose. For the best results, consider combining it with a bit of vital wheat gluten to mimic bread flour’s composition. This adjustment will still let you create a lovely loaf that rises beautifully.
How do I store Japanese milk bread for freshness?
To keep your Japanese milk bread by hand fresh, it’s essential to store it properly. Here are some tips:
- Room Temperature: If you plan to eat it within a couple of days, store the bread in an airtight container at room temperature.
- Refrigeration: For longer storage, refrigerate the bread, but it may slightly dry out. Seal it tightly to minimize moisture loss.
- Freezing: Slice your bread and freeze individual portions. Use freezer-safe bags, and it will stay fresh for up to three months. Just pop a slice in the toaster or microwave to enjoy anytime!
Understanding these storage tips will help you savor your delicious creation for longer. For more baking tips, check out King Arthur Baking and The Kitchn for inspiration and guidance!
Conclusion on Japanese Milk Bread by Hand
As we wrap up our journey on making Japanese milk bread by hand, it’s clear that the smile it brings on your face is worth every ounce of effort. Homemade bread isn’t just about the ingredients; it’s about the experience and satisfaction of creating something delightful from scratch.
-
Flavor and Freshness: There’s nothing quite like the taste of warm, freshly baked bread. The aroma that fills your kitchen is enough to make any day brighter.
-
Simple Ingredients: With no milk powder and everyday items, you can whip up this delicious loaf anytime.
So, why not give it a try? Dive into the world of baking and savor the joy that comes with it. You won’t regret putting in the time for this tasty treat! If you’re craving expertise, check out resources from Bread Ahead for more tips and tricks to elevate your bread-making skills. Happy baking!
PrintJapanese milk bread by hand: The easy way to soft perfection
A delightful recipe for making soft and fluffy Japanese milk bread by hand without using milk powder.
- Prep Time: 20 minutes
- Cook Time: 30 minutes
- Total Time: 2 hours 20 minutes
- Yield: 1 loaf 1x
- Category: Bread
- Method: Baking
- Cuisine: Japanese
Ingredients
- 3 cups all-purpose flour
- 1/4 cup granulated sugar
- 1 teaspoon salt
- 1 tablespoon instant yeast
- 1/2 cup whole milk, warm
- 1/4 cup unsalted butter, softened
- 1 large egg
Instructions
- In a mixing bowl, combine the flour, sugar, salt, and yeast.
- Add warm milk, butter, and egg to the dry ingredients.
- Mix until a dough forms, then knead by hand on a floured surface until smooth.
- Let the dough rise in a warm place until doubled in size.
- Shape the dough into a loaf and place it in a greased loaf pan.
- Allow it to rise again, then bake in a preheated oven until golden brown.
- Cool before slicing.
Notes
- Using warm milk helps activate the yeast more effectively.
- For additional flavor, consider adding a teaspoon of vanilla extract.
Nutrition
- Serving Size: 1 slice
- Calories: 150
- Sugar: 4g
- Sodium: 180mg
- Fat: 6g
- Saturated Fat: 4g
- Unsaturated Fat: 1g
- Trans Fat: 0g
- Carbohydrates: 20g
- Fiber: 1g
- Protein: 3g
- Cholesterol: 30mg
Keywords: Japanese milk bread, soft bread, no milk powder